Jerome did a great job introducing the chunking script and then explaining how to implement it in his article. Since then, Phaser’s API has evolved significantly enough to warrant an update.
In this article I’ll cover what is needed to implement the chunking approach with the current version of Phaser (3.55.2) and how make it work with the isometric map, which Phaser supports starting from version 3.50.0.
Making it work with Phaser 3.55.2 (and above)
To make it work with the current stable version of Phaser (3.55.2) we need to add just one line in the removeChunk method
Game.scene.cache.tilemap.remove(`chunk${chunkID}`);Game.maps[chunkID].destroy();
Game.scene.cache.tilemap.remove(`chunk${chunkID}`);
var idx = Game.displayedChunks.indexOf(chunkID);
if(idx > -1) Game.displayedChunks.splice(idx,1);createStaticLayer to createLayer in the displayChunk method.Additionally I checked if this updated version will work with the future version of the Phaser (v3.60.0 Beta 3 at the time of writing) and it will. So there won’t be needed any more changes to make it working in the nearest future.
Making it work with isometric maps
Creating an isometric map with Tiled
For this example I created an isometric map with the Tiled map editor. The map has a width of 80 tiles and a height of 80 tiles. The tiles are of size 64px*32px. The map has one layer named “Ground”. I filled the “Ground” using the tileset used in one of the Phaser’s example.
Next I exported it as a json file from the Tiled editor (both files, Tiled *.tmx and exported *.json, are in the demo repo) and I used that json file to generate the map chunks using the splitter script (chunks json files are in the demo repo too, in chunks directory).
Also to make it working with Phaser we need to add the tileset file in the preload method
this.load.image("tiles", "assets/tilesheet_iso.png");So now we have the map splitted into chunks and we can implement the way to (un)loading them dynamically.
Using isometric map chunks with Phaser
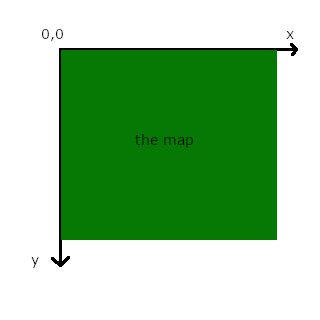
Phaser started supporting isometric tilemaps from version 3.50.0 and it handles isometric maps a little bit differently than the regular two dimensional maps. The main difference is that, with the regular two dimensional map the origin of the coordinate system is at the top-left corner starting from the x=0,y=0 coordinates and having positive numbers only:
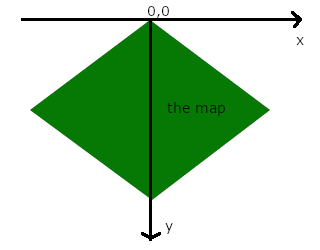
With isometric map tiles are rotated squares (rhombuses) and the origin of the coordinate system is at the top-middle point starting from x=0, y=0, allowing only positive y values but both negative and positive x values:
Depending on the dimensions of your tiles the shape of the map may differ.
Let’s go step by step and implement loading map chunks in Phaser with isometric map.
Updating the environment
So we start with the create() method. We get the data from the master.json and we calculate useful constants.
const {
  chunkHeight,
  chunkWidth,
  mapHeight,
  mapWidth,
  nbChunksX,
  nbChunksY,
  tileHeight,
  tileWidth,
} = this.cache.json.get("master");

this.chunkHeight = chunkHeight;
this.chunkWidth = chunkWidth;
this.mapHeight = mapHeight;
this.mapWidth = mapWidth;
this.nbChunksX = nbChunksX;
this.nbChunksY = nbChunksY;
this.tileHeight = tileHeight;
this.tileWidth = tileWidth;

this.lastChunkID = this.nbChunksX * this.nbChunksY - 1;
this.chunkHalfWidth = (this.chunkWidth / 2) * this.tileWidth;
this.chunkHalfHeight = (this.chunkHeight / 2) * this.tileHeight;
Next we call this.updateEnvironment(); method for the first time. In this tutorial we will call updateEnvironment after every movement of the player.
In the beginning of the updateEnvironment method we get the player’s current chunkID:
const chunkID = this.computeChunkID(
  ...this.getChunkXYFromPlayerXY(this.player.x, this.player.y)
);
So we pass player’s x,y to the getChunkXYFromPlayerXY method. There we compute the tile of the player using the getTileFromXY method and we use it to compute the chunk XY (eg. chunk0 is X=0, Y=0 and chunk5 is X=1, Y=1 for our map which is 4 chunks width and 4 chunks height) which we pass to the final computeChunkID method.
The reasoning about the chunks IDs stays the same as Jerome explained it his article.
When we have player’s current chunkID we can get the array of chunks that the player should see
const chunks = getSurroundingTiles({
  positionTile: IDToXY({
    ID: chunkID,
    nbChunksX: this.nbChunksX,
    nbChunksY: this.nbChunksY,
  }),
  includeMainObject: true,
  endX: this.nbChunksX - 1,
  endY: this.nbChunksY - 1,
}).map(({ x, y }) => this.computeChunkID(x, y));
Details of the getSurroundingTiles I’m covering later.
If you want you can use Jerome’s listAdjacentChunks – the result will be the same.
Next steps are similar to the ones from Jerome’s original post.
We get newChunks and oldChunks:
const newChunks = findDiffArrayElements(chunks, this.displayedChunks); // Lists the surrounding chunks that are not displayed yet (and have to be)
const oldChunks = findDiffArrayElements(this.displayedChunks, chunks); // Lists the surrounding chunks that are still displayed (and shouldn't anymore)
and we iterate over the new (needing to be loaded) and old (needing to be removed) ones:
newChunks.forEach((chunk) => {
  console.log(`loading chunk${chunk}`);
  this.load.tilemapTiledJSON(
    `chunk${chunk}`,
    `assets/map/chunks/chunk${chunk}.json`
  );
});

if (newChunks.length > 0) {
  this.load.start(); // Needed to trigger loads from outside of preload()
}

oldChunks.forEach((chunk) => {
  console.log(`destroying chunk${chunk}`);
  this.removeChunk(chunk);
});
Displaying chunks
displayChunk method is called from the Phaser’s preload method whenever we load new chunks:
preload() {
  // We will be loading files on the fly, so we need to listen to events triggered when
  // a file (a tilemap, more specifically) is added to the cache
  this.cache.tilemap.events.on("add", (cache, key) => {
    this.displayChunk(key);
  });
  // ...
}
We are passing a key parameter (which is just a string, eg. chunk0) to the displayChunk method so we can make tilemap and add tileset images to it:
const map = this.make.tilemap({ key });
// The first parameter is the name of the tileset in Tiled and the second parameter is the key
// of the tileset image used when loading the file in preload.
const tiles = map.addTilesetImage("tilesheet_iso", "tiles");
Next we exctract chunkID from the passed key so we can calculate useful constants:
// We need to compute the position of the chunk in the world
const chunkID = parseInt(key.match(/\d+/)[0], 10); // Extracts the chunk number from file name
const chunkX = Math.floor(chunkID / this.nbChunksX);
const chunkY = chunkID % this.nbChunksX;
const isCenterChunk = (chunkID - chunkX) % this.nbChunksX;
Having all this informations we can determine where a chunk should be render on the screen.
For two dimensional maps in Phaser you can just do what Jerome did in his tutorial:
for(var i = 0; i < map.layers.length; i++) {
  // You can load a layer from the map using the layer name from Tiled, or by using the layer
  // index
  var layer = map.createStaticLayer(i, tiles, chunkX*32, chunkY*32);
  // Trick to automatically give different depths to each layer while avoid having a layer at depth 1 (because depth 1 is for our player character)
  layer.setDepth(2*i);
}
But for isometric map it’s a little bit more tricky. The algorithm that I came up with looks like this:
let offset;

if (isCenterChunk === 0) {
  offset = {
    x: 0,
    y: chunkX * this.chunkHalfWidth,
  };
} else if (chunkID < this.nbChunksX * chunkX + chunkX) {
  offset = {
    x:
      -(chunkX * this.chunkHalfWidth) +
      (chunkID % this.nbChunksX) * this.chunkHalfWidth,
    y:
      chunkX * this.chunkHalfHeight +
      (chunkID % this.nbChunksX) * this.chunkHalfHeight,
  };
} else {
  offset = {
    x: ((chunkY - chunkX) % this.nbChunksX) * this.chunkHalfWidth,
    y: (chunkX + chunkY) * this.chunkHalfHeight,
  };
}
Let’s break it down to pieces. Having in mind that our isometric map is a rotated square and that the chunks are indexed from 0, the layout looks like this:
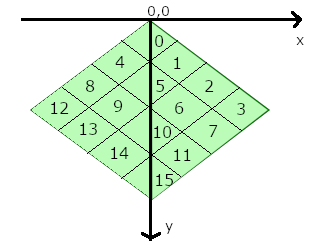
Phaser needs to know where to render the chunk on the screen and the starting point of the chunk is its top corner.
Looking at the picture is easy to see that the chunks 0, 5, 10 and 15 have theirs starting points precisely at the X axis (marked with red dots).
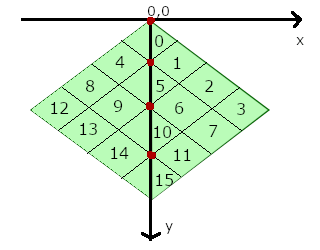
So that’s the first part of our algorithm.
if (isCenterChunk === 0) {
  offset = {
    x: 0,
    y: chunkX * this.chunkHalfWidth,
  };
}
Next we check if the chunk is on the left side of the X axis
else if (chunkID < this.nbChunksX * chunkX + chunkX) {
  offset = {
    x:
      -(chunkX * this.chunkHalfWidth) +
      (chunkID % this.nbChunksX) * this.chunkHalfWidth,
    y:
      chunkX * this.chunkHalfHeight +
      (chunkID % this.nbChunksX) * this.chunkHalfHeight,
  };
}
if it’s not the center chunk or left chunk it must be the chunk on the right side
else {
  offset = {
    x: ((chunkY - chunkX) % this.nbChunksX) * this.chunkHalfWidth,
    y: (chunkX + chunkY) * this.chunkHalfHeight,
  };
}
At the end of the displayChunk method we create a layer named Ground passing the calculated offsets
map.createLayer("Ground", tiles, offset.x, offset.y);

this.maps[chunkID] = map;
this.displayedChunks.push(chunkID);
Summary
Working with big maps in Phaser may be frustrating but Jerome’s chunking script fixes the performance issues. If you want to use it with the isometric map you just need to do a few adjustments and you’re free to have fun working on your game.
Extras
Get surrounding tiles
Jerome by creating the listAdjacentChunks method achieved exactly what is needed – the method returns the array of the chunks surrounding given chunk. For my game I wanted to have a generic method that would give me a list of surrounding chunks (or tiles) given a certain configuration, e.g. give me the tiles around the object with different sizes (not occupying one tile but maybe many tiles) and give me not only the closest tiles but a range of them (sizeToIncrease).
If we want to include the main object we need to use the helper function getObjectTiles
const getObjectTiles = ({ positionTile, size = { x: 1, y: 1 } }) => {
  if (size.x <= 0 || size.y <= 0) {
    return [];
  }

  const { x, y } = positionTile;

  const objectTiles = [];

  for (let xi = x; xi < x + size.x; xi += 1) {
    for (let yj = y; yj < y + size.y; yj += 1) {
      objectTiles.push({ x: xi, y: yj });
    }
  }

  return objectTiles;
};
Going back to the getSurroundingTiles function, startX, startY, endX and endY are describing the size of our two dimensional board, eg. our map is 4x4 so our defaults are exactly for our map chunks.
const getSurroundingTiles = ({
  positionTile,
  size = { x: 1, y: 1 },
  sizeToIncrease = { x: 1, y: 1 },
  startX = 0,
  startY = 0,
  endX = 4,
  endY = 4,
  includeMainObject = false,
}) => {
  const { x, y } = positionTile;

  if (x < 0 || y < 0) {
    return [];
  }

  let objectTiles = [];

  if (!includeMainObject) {
    objectTiles = getObjectTiles({ positionTile, size });

    if (objectTiles.length === 0) {
      return [];
    }
  }

  const tiles = [];

  for (
    let xi = x - sizeToIncrease.x;
    xi < x + size.x + sizeToIncrease.x;
    xi += 1
  ) {
    for (
      let yj = y - sizeToIncrease.y;
      yj = startX &&
        xi = startY &&
        yj  xi === objectTile.x && yj === objectTile.y
        )
      ) {
        tiles.push({ x: xi, y: yj });
      }
    }
  }

  return tiles;
};
Each of our chunk is build from small tiles of size 64px x 32px and each chunk is 20 tiles width and 20 tiles height. So another purpose of this function may be calculating range of tiles around the building. Let say we have building of size 2x3 tiles and we want to get tiles surrounding that building.
getSurroundingTiles({
  positionTile: { x: 6, y: 4 }, // ID: 70
  size: { x: 2, y: 3 },
  sizeToIncrease: { x: 2, y: 2 },
  endX: 15,
  endY: 15,
});
Try it yourself here.
Splitter script performance issues with big maps
console.log, I tried again and I saw chunking being created slowly
I’m Jakub, I live in Poland, I am front-end developer, you can find me at github.com/neu5