Contents
One solution for dealing with huge maps is to compartmentalize your world in several moderately sized areas, which can only be accessed through controlled bottlenecks, such as valleys or gates. That way, you know when to load each area and have only a much smaller amount of map data in memory at any time (the guys of Firewatch do something like that.)
Another solution, which I use myself for Westward, is to split your world map in a mosaic of many many smaller “chunks”. The idea is then to only load and draw the chunks surrounding the player, and to do so on the fly as the player moves. This approach has the advantage over the previous one that it does not constraint the topology of your world at all (no need for controlled access points), and is the one I’ll be implementing in this tutorial. Below you can see a visual representation of this.
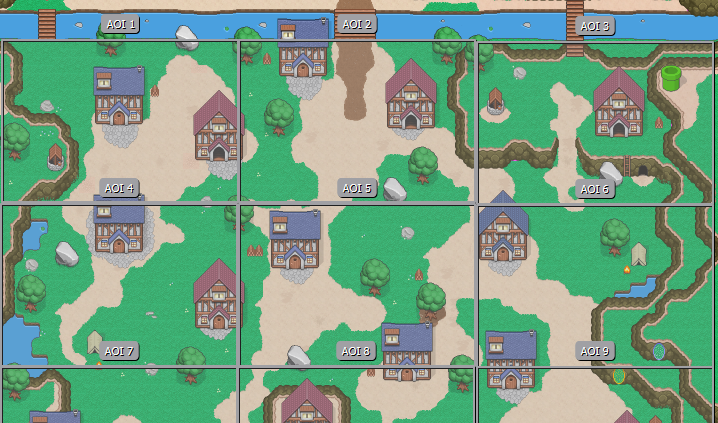
This example shows a village (from Phaser Quest) which has been divided in 9 chunks. (They are called “AOI” in the screenshot, for Area of Interest, because I reused this image from a previous article on the closely related topic of interest management.)
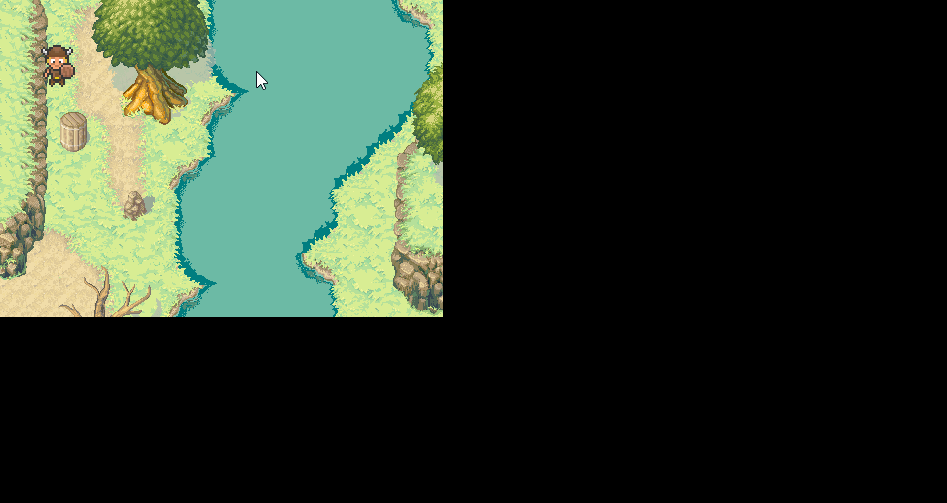
Here is another visualization, from an early Westward dev log, showing how very small chunks are loaded and unloaded as the player moves:
In this tutorial, I’ll tell you about:
- A tool to split an existing Tiled tilemap into chunks
- How to reason about chunks based on their ID’s and the world dimensions
- How to load and destroy them on the fly using Phaser 3
All of this will be packed in a small demo where you move your character by clicking on a map.
Note that I’ll be talking here about Tiled maps, because it’s one of the most common formats for tilemaps for 2D games. The process to split another tilemap format into chunks might be slightly different. One you have your chunks though, managing them in Phaser 3 will work the same!
Creating chunks
We’ll start with a standard map in TMX format, which can be found in the repository in assets/map/fullmap.tmx. Its dimensions are 100×100 tiles, which is very small but will do fine for an example.
The splitting into chunks is not done in Tiled, but with a Node.js app I wrote, located in splitter/splitmap.js. But first we need to export our TMX map to the JSON format. To do so, in Tiled go to File > Export As and select the JSON format in the list of file formats. A JSON export of the example map is already located at assets/map/fullmap.json
Pro tip: Tiled supports reading and writing to JSON files, so you can actually edit the JSON file directly with Tiled, without having to go through the TMX and then exporting it. Very convenient!
Once you have your map in JSON format, you can feed it to the splitter. The readme file of the code repository contains instructions as how to run it, but it would basically look like node splitmap.js -i fullmap.json. By default, it’ll create 25 JSON files corresponding to chunks of dimensions 20×20 tiles each, and store them in assets/maps/chunks (where pre-made chunks are already waiting for you), along with a “master file” master.json. Feel free however to play around with the splitter and make chunks of different dimensions!
The master file is important, and contains information about the dimensions of your game world: the width and the height (in tiles) of your chunks, and the number of chunks horizontally and vertically. These pieces of information together also indicate the dimensions of the initial map. All of this will be required later to determine two things: which chunks to display and how to position them.
Note that in the example, the master file contains data about the tileset as well. This information is not used in the demo, but depending on your situation, it could be useful for you to have one central file storing tilesets data (as is my case for Westward). Feel free to adapt the master file according to your needs.
Note also that every single chunk file contains a copy of the tileset data as well. It may seem redundant, but it’s actually quite useful if you want to edit the chunks post-split! As long as the tileset data is present in them, they will be recognized as full-fledged tilemaps by Tiled, allowing you to open and modify them individually without splitting all over again. When the time comes to release your game though, it would be a nice cleanup step to remove the tileset data from the chunks though.
Reasoning about chunks
Now that we have our chunks, let’s think about how they are organized. This section will discuss some operations on chunks which will make understanding the code easier.
In order to have a visual example, below you’ll see a representation of a map split into a grid of 16 chunks (4×4). For this example, consider in addition that each chunk is of dimensions 5×5 tiles. Therefore the world is 20 tiles wide and 20 tiles long.
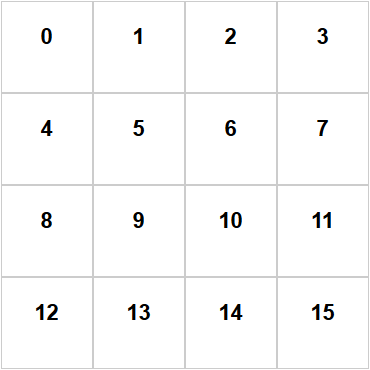
It’s important to notice that the top left chunk is numbered 0, and that the numbering goes from left to right and from top to bottom. These numerical IDs are crucial to refer to the chunks and understand their spatial organization.
The first thing to consider is how to determine in which chunk is the player, based on its x and y coordinates. The method below shows how to derive the ID of the chunk from the coordinates:
Game.computeChunkID = function(x,y){
    var tileX = Math.floor(x/32); // Tiles are of size 32x32 in this case
    var tileY = Math.floor(y/32);
    var chunkX = Math.floor(tileX/Game.chunkWidth);
    var chunkY = Math.floor(tileY/Game.chunkHeight);
    return (chunkY*Game.nbChunksHorizontal)+chunkX;
};
First, the pixel coordinates are converted in tile coordinates. Second, the position of the chunk in the grid is computed based on the tile coordinates, using our knowledge about the dimensions of the chunks. Finally, the chunk ID can be computed by the formula in the last line.
For example, suppose that your player is at position (445,429) (where x and y coordinates begin in the top-left corner of the map as usual). This will correspond to tile-coordinates (13,13), and to chunk-coordinate (2,2). Visually, you can see on the grid that it should correspond to chunk 10. If you apply the last formula, (3*4)+3, you indeed obtain 10.
Knowing on which chunk you are located is useful, because you now know which chunk you should load and display. But we can go further, and determine what the surrounding chunks are. For example, if you are in chunk 6, how to know the ID of the chunk right above yours? Simple:
var topChunk = currentChunk - nbChunksHorizontal
In this case, 6 - 4 = 2, which is indeed the ID of the chunk directly above chunk 6.
Similar computations can be done in order to list all the chunks surrounding the current one (as is done in Game.listAdjacentChunks()). Why are we interested in the surrounding chunks as well? The idea is that you never, ever want your player to see black areas where a chunk hasn’t loaded yet. Assuming your chunks are roughly the size of your game window, loading all the chunks around the current one ensures that there is a “security” buffer of chunks all around, that will be seen by the player if he walks around the edges of his current chunk. And when he crosses to another chunk, there should be enough time to load the new neighbors.
In our example grid, if your player is located in chunk 6, you would typically load chunks 1, 2, 3, 5, 6, 7, 9, 10 and 11.
Of course, depending on the size of your chunks and the movement speed of your player, you may need to keep a different amount of chunks displayed at any time.
With all of the above, you can, based on the specifics of your game, identify which chunks need to be displayed based on the location of the player. In the next section, we’ll see how to actually display them.
(Un)loading chunks on the fly
Preparations
A few steps have to be undertaken first. Obviously, you need to load your tileset(s). In this example, the same unique tileset is used by all chunks, so we know for sure that we will need it, therefore we only load it once in preload(). At the same time, we also load the master file discussed above. For both file types, we use the vanilla Phaser loader.
this.load.image('tiles', 'assets/tilesheet.png');
// This master file contains information about your chunks; see splitter/splitmap.js how it is created
this.load.json('master', 'assets/map/chunks/master.json');
Note that if you use different tilesets for different parts of your game, you might want to refine this a bit in order to not only load the chunks on the fly, but the tilesets as well, based on the player position!
As we will be loading tilemaps on the fly, we need an asynchronous way to react to new tilemap data. The second step is therefore to set up a callback that will be triggered each time a new tilemap lands in the cache.
this.cache.tilemap.events.on('add',function(cache,key){
        Game.displayChunk(key);
});
Where Game.displayChunk() is a custom method that will expect the key of the tilemap in Phaser’s cache.
After Game.preload() is done loading what we asked it to load, Game.create() will be called automatically, where we can set up several data structures that we will use to manage the chunks. That part is relatively self-explanatory, and can be adapted according to your needs and preferences, so long as you manage to keep track of the displayed chunks.
Game.maps = {}; // Maps chunk id's to the corresponding tilemaps; used to be able to destroy them
    Game.displayedChunks = []; // List of the id's of the chunks currently displayed
    var masterData = this.cache.json.get('master');
    Game.chunkWidth = masterData.chunkWidth;
    Game.chunkHeight = masterData.chunkHeight;
    Game.nbChunksHorizontal = masterData.nbChunksHorizontal;
    Game.nbChunksVertical = masterData.nbChunksVertical;
    Game.lastChunkID = (Game.nbChunksHorizontal*Game.nbChunksVertical)-1;
The rest of the code in Game.create() is standard Phaser 3 code to set up a sprite, have the camera follow it and make the game react to pointer clicks. That too can change depending on your game. But whatever way of moving your character you choose, a key step will be to call Game.updateEnvironment() after each movement.
Updating the environment
This is the core method of the load-on-the-fly process, and is mostly concerned with three things: computing, based on chunk IDs, which ones should be displayed; displaying them (and destroying the ones that should not be displayed anymore); and keeping track efficiently of what’s on-screen using the previously defined data structures. Let’s have a look at this step by step.
var chunkID = Game.computeChunkID(Game.player.x,Game.player.y);
var chunks = Game.listAdjacentChunks(chunkID); // List the id's of the chunks surrounding the one we are in
var newChunks = Game.findDiffArrayElements(chunks,Game.displayedChunks); // Lists the surrounding chunks that are not displayed yet (and have to be)
var oldChunks = Game.findDiffArrayElements(Game.displayedChunks,chunks); // Lists the surrounding chunks that are still displayed (and shouldn't anymore)
First, based on the x and y coordinates of the player, the ID of the current chunk can be computed (see previous section). This information, in turn, can be used to list the IDs of all surrounding chunks. They can then be displayed one by one. However, it is useless to display an already-displayed chunk. Therefore, we make a list of “new chunks”, by checking which of the chunks to display are not already listed in our list of displayed chunks. Similarly, we can list the chunks that won’t be displayed anymore and can be removed.
newChunks.forEach(function(c){
        console.log('loading chunk'+c);
        Game.scene.load.tilemapTiledJSON('chunk'+c, 'assets/map/chunks/chunk'+c+'.json');
});
if(newChunks.length > 0) Game.scene.load.start(); // Needed to trigger loads from outside of preload()
Loading chunks leverages the Phaser 3 loader and is therefore very simple. Don’t forget to call load.start() each time you want to load new files though, otherwise nothing will happen. When the chunk will be fully loaded and the corresponding data will be present in the cache, Game.displayChunk() will be called, thanks to the previously set callback. Note that Phaser will load the file even if there is already some data with the corresponding key in the cache; it is up to you to check first if you wish to avoid loading data that you have already loaded in the past.
I refer you to the code regarding the removal of chunks, which takes place in Game.removeChunk() and is fairly straightforward.
Finally, the displaying of the chunk is similar to displaying any usual tilemap. The only subtlety is that each chunk has to be positioned differently, based on its ID. Computing the coordinates of the chunk can be done using the following code, which you can re-use as is:
// We need to compute the position of the chunk in the world
var chunkID = parseInt(key.match(/\d+/)[0]); // Extracts the chunk number from file name
var chunkX = (chunkID%Game.nbChunksHorizontal)*Game.chunkWidth;
var chunkY = Math.floor(chunkID/Game.nbChunksHorizontal)*Game.chunkHeight;
And that’s it! We have covered the most important aspects of the code, and you should now be able to adapt it according to your needs to display a big map in your game. Feel free to ask in the comments if you want more precisions or if you have suggestions to improve the code.
Jerome Renaux
I'm an independent game developer, working mainly on browser-based multiplayer online game (HTML5 & Javascript). I love to discuss about all aspects of game development so don't hesitate to get in touch!
Follow Me: