Contents
In this tutorial, we’ll be using the great Easystar pathfinding library to compute paths for us in a basic Phaser 3 game, and see how we can translate the paths computed by Easystar into actual smooth motions of the player character using a Phaser 3 timeline. We will used Tiled (with which I assume basic familiarity on your part) to set up the tilemap and indicate the obstacles, as well as see how to make some terrains less preferable than others by attributing costs to them.
Setting the tile properties in Tiled
In the assets folder of the repository, you will find the TMX file of the map used with the demo, as well as its tileset (borrowed from the Phaser 3 examples repository) and a JSON export of the map. As you can see, the tileset consists of blocks of various colors.
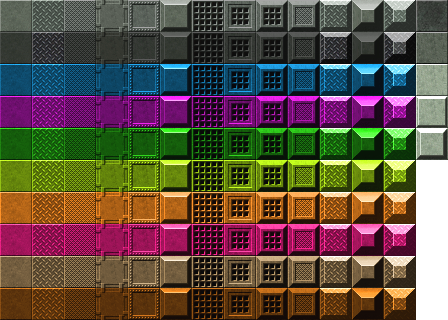
To make the map, I only used blocks from the 2nd and 6th columns of the tileset, in addition to the tile in the top-left corner. My intent is that the textured tiles of the 2nd column should be “walkable” (that is, you can go through them), but more costly that the normal walkable tile in the top-left. In addition, the solid blocks of the 6th columns should be obstacles, not walkable at all. The most convenient and efficient way to convey this intent is to incorporate this information directly into the tileset, using Tiled! To do so, first open the tileset settings:
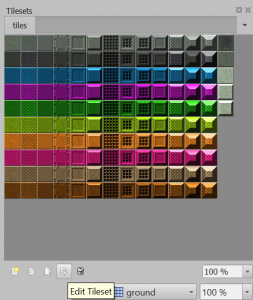
The following gif shows how to add properties to specific tiles. In this case, the boolean collide property to the obstacles, and the numeric cost property to some terrains. We don’t need to set collide to false for all the other tiles; in the code (see below) we will assume that no property means “walkable”.
After this is done, don’t forget to export the map in JSON so that we can read it with Phaser. You can inspect the JSON export present in the repository and see the tile properties that have been defined.
Reading the properties and configuring Easystar
First, make sure to create your tilemap in Phaser. I won’t go into the details of this, but here is the code snippet corresponding to this step, so we are all on the same page.
Game.map = Game.scene.make.tilemap({ key: 'map'});
var tiles = Game.map.addTilesetImage('tiles', 'tileset');
Game.map.createStaticLayer(0, tiles, 0,0);
Then, after you have included/imported Easystar in your project, the next step is to initialize the pathfinder, which we do inside of create():
Game.finder = new EasyStar.js();Easystar (and most other pathfinding libraries) operate on a 2D array that represents your map. In our case, each entry of the array corresponds to a tile of the tilemap. In order to populate this 2D array, we will be iterating over all the possible coordinates of the map, and fetch from the tilemap data the ID of the tile at each location.
var grid = [];
    for(var y = 0; y < Game.map.height; y++){
        var col = [];
        for(var x = 0; x < Game.map.width; x++){
            // In each cell we store the ID of the tile, which corresponds
            // to its index in the tileset of the map ("ID" field in Tiled)
            col.push(Game.getTileID(x,y));
        }
        grid.push(col);
    }
Game.finder.setGrid(grid);
Where Game.getTileID() leverages the Phaser 3 Tilemap API to fetch the info we need:
Game.getTileID = function(x,y){
    var tile = Game.map.getTileAt(x, y);
    return tile.index;
};
Pretty straightforward. We now have a 2D matrix that mirrors our tilemap. It contains numbers, which correspond to the IDs of the tiles in your tileset. This information is great to represent the layout of the map. Now, we need to inform Easystar about the constraints of the map; that is, what are the obstacles and whether there are costs to take in consideration or not.
The Easystar methods used to do that use the tile IDs, which makes the link with our 2D matrix. One method is setAcceptableTiles(), which takes a list of tile IDs that will be walkable, and setTileCost(), which, well, associates costs to specific tile IDs.
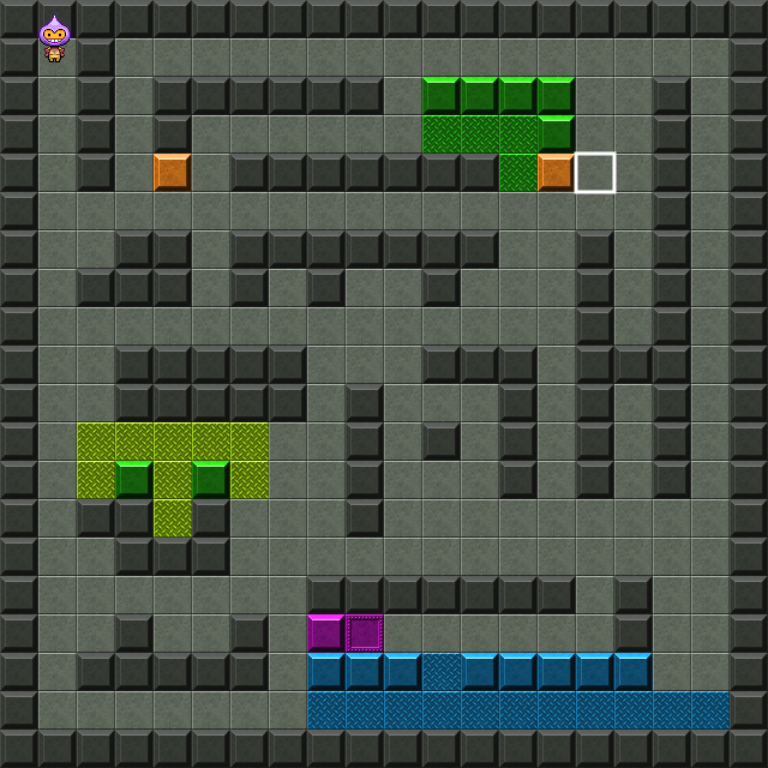
A quick word about the costs. If you move around in the demo, you'll see that the character correctly moves around the black blocks, as expected. More interesting is what happens when you move around the colored ground tiles. You will notice that in these cases, the character doesn't always take the shortest path.
The character takes a longer path, avoiding the green ground, although it is not an obstacle. It's perfectly normal! In Tiled, I have indicated a higher cost to these tiles, so that they tend to be avoided more. For example, if the algorithm identifies two paths, one path of 3 tiles of cost 1 each, and one path of 2 tiles of cost 2 each, the first path will be taken. It's longer, but has a lower overall cost.
In your own game, this mechanic can be very interesting to make different terrains, like swamps or shallow rivers. In a RTS for example, your units might try to avoid these terrains because they might move slower in them (which would be reflected by a higher cost). Nevertheless, since these wouldn't be obstacles, they could still be able to cross them when the situation requires it.
Now back to the implementation. Remember that we stored the information about terrain in the tileset itself. This information is read along all the rest by Phaser when importing the tilemap, so we can easily access and iterate over it:
var tileset = Game.map.tilesets[0];
var properties = tileset.tileProperties;
var acceptableTiles = [];

for(var i = tileset.firstgid-1; i < tiles.total; i++){ // firstgid and total are fields from Tiled that indicate the range of IDs that the tiles can take in that tileset
        if(!properties.hasOwnProperty(i)) {
            // If there is no property indicated at all, it means it's a walkable tile
            acceptableTiles.push(i+1);
            continue;
        }
        if(!properties[i].collide) acceptableTiles.push(i+1);
        if(properties[i].cost) Game.finder.setTileCost(i+1, properties[i].cost); // If there is a cost attached to the tile, let's register it
    }
Game.finder.setAcceptableTiles(acceptableTiles);
Beware of the i+1 shenanigan, due to the fact that tile IDs in Tiled start at 1, and not 0. Also, note the assumption we make that tiles about which we didn't indicate anything should be considered as walkable tiles by default. If you have much more collidable tiles than not, it may be more efficient in your case to do the opposite, and only label the non-collidable ones in Tiled.
Pathfinding and tweening along a path
Now all is set to perform and use pathfinding. We want the character to move when clicking a tile. In Game.handleClick(), we start by computing the tile coordinates of the start and the end of the path:
var x = Game.camera.scrollX + pointer.x;
var y = Game.camera.scrollY + pointer.y;
var toX = Math.floor(x/32);
var toY = Math.floor(y/32);
var fromX = Math.floor(Game.player.x/32);
var fromY = Math.floor(Game.player.y/32);
console.log('going from ('+fromX+','+fromY+') to ('+toX+','+toY+')');
Then we can compute the path:
Game.finder.findPath(fromX, fromY, toX, toY, function( path ) {
        if (path === null) {
            console.warn("Path was not found.");
        } else {
            console.log(path);
            Game.moveCharacter(path);
        }
    });
Game.finder.calculate();
Don't forget te calculate() call at the end! findPath() merely registers the parameters of the path, and doesn't automatically start the computation.
The computed path will be an array of tile coordinates, each tile represented by a small object with an x and a y field. We need to use this information to set up tweens to make the character move. Phaser 3 introduced a nice concept called timeline, which allows to easily and seamlessly chain multiple tweens together. Let's have a look at Game.moveCharacter() where the magic happens:
Game.moveCharacter = function(path){
    // Sets up a list of tweens, one for each tile to walk, that will be chained by the timeline
    var tweens = [];
    for(var i = 0; i < path.length-1; i++){
        var ex = path[i+1].x;
        var ey = path[i+1].y;
        tweens.push({
            targets: Game.player,
            x: {value: ex*Game.map.tileWidth, duration: 200},
            y: {value: ey*Game.map.tileHeight, duration: 200}
        });
    }

    Game.scene.tweens.timeline({
        tweens: tweens
    });
};
The for loop is used to create a list of tweens. Each individual tween will be responsible for moving along a single tile of the path, using the information found in the corresponding cell of the path array. When all the tweens are set up, they can be provided to a new timeline instance which will start automatically. Have a look at the timeline examples for more information.
That's it. We have seen how to ready your map in Tiled for pathfinding, how to set up Easystar and read the data from your map, compute a path and translate it into movement using a timeline. You can see it all in action in the demo, or, at this point, in your own game hopefully!
Jerome Renaux
I'm an independent game developer, working mainly on browser-based multiplayer online game (HTML5 & Javascript). I love to discuss about all aspects of game development so don't hesitate to get in touch!
Follow Me: