Contents
I will provide a high-level explanation of what shaders are. I will not however cover in details all the things you can do with them. Good references already exist for that, such as the book of shaders or this resource.
But as the saying goes, “a nice demo with a few shaders is worth 1,000 words”. So here are the links to the demo I have made.
I have taken, as is, the Phaser 3 “Breakout” example game as a base and slapped a dat.gui interface on top of it to control three example shaders, which perform the following effects:
- The grayscale shaders turns everything to grayscale.
- The distortion shader distorts the space of the game.
- The spotlight shader simulates a light pointed on the ball, leaving the rest of the game scene in the dark.
Hopefully, these three examples provide a good first impression of what you can do with shaders in Phaser 3. I invite you to have a look at the demo and experiment with the parameters before reading further.
Note: shaders are a WebGL-only functionality, they won’t work in Canvas mode!
What are shaders?
In layman terms, shaders are cool effects that you can apply to a graphical scene. One category of shaders, called “fragment shaders”, are functions that control the color taken by one pixel. A shader is applied to all pixels of your scene, in parallel and fully independently from each other. Depending on pixel-specific variables (position, color…), the result will not be the same for all pixels. The combination of (possibly wildly different) results of applying the shader to all the pixels gives the interesting effects you can see in the demo.
For example, a basic fragment shader could set the color of a pixel to red. Applied to all pixels, it would produce a completely red scene. More interestingly, the shader could instead set the red level of a pixel to be proportional to its x coordinate. Applied to all pixels, it would produce a horizontal gradient!
Another category of shaders are vertex shaders, but I’ll not cover them here. All that follows therefore pertains to fragment shaders.
The next section explains how the effects in the demo have been achieved using custom shaders in Phaser 3. I start with the grayscale shader. It’s the simplest and allows to see how to actually set up the game to use shaders. I then proceed with the other two which are a bit more complex and use data passed from the game. I will focus on the shaders and not on the whole Breakout code.
Grayscale shader
Creating the shader
Shaders are applied in Phaser 3 by feeding a custom TextureTintPipeline to the camera. So the first step is to define your custom pipeline/shader. In the demo, the three shaders are defined in pipelines.js
Let’s have a look at the GrayscalePipeline
var GrayscalePipeline = new Phaser.Class({

    Extends: Phaser.Renderer.WebGL.Pipelines.TextureTintPipeline,

    initialize:

    function GrayscalePipeline (game)
    {
        Phaser.Renderer.WebGL.Pipelines.TextureTintPipeline.call(this, {
            game: game,
            renderer: game.renderer,
            fragShader:`
                precision mediump float;
                uniform sampler2D uMainSampler;
                varying vec2 outTexCoord;
                void main(void) {
                vec4 color = texture2D(uMainSampler, outTexCoord);
                float gray = dot(color.rgb, vec3(0.299, 0.587, 0.114));
                gl_FragColor = vec4(vec3(gray), 1.0);
                }`
        });
    }
});
Most of the code above is actually boilerplate to make a custom class that inherits from Phaser.Renderer.WebGL.Pipelines.TextureTintPipeline. When making your own, you’ll essentially copy/paste it. The interesting part is the fragShader attribute: this is what actually defines your shader. Let’s focus on it below:
precision mediump float;
uniform sampler2D uMainSampler;
varying vec2 outTexCoord;
void main(void) {
    vec4 color = texture2D(uMainSampler, outTexCoord);
    float gray = dot(color.rgb, vec3(0.299, 0.587, 0.114));
    gl_FragColor = vec4(vec3(gray), 1.0);
}
Shaders use the GLSL language, the OpenGL Shader Language which has a syntax similar to C++. Every shader should contain a main() function. That function will be called for every pixel. At the end of the computations, we set the color of the pixel by setting gl_FragColor to some value. In shader land, colors are represented as vectors of the form (red, green, blue, alpha). The different values indicate the amount of red, green and blue to mix, as well as the level of transparency (alpha).
In most situations, you’ll want to apply effects to the textures displayed by the camera of your game. Here, the effect will be to change the color levels of each pixel so that the whole scene turns to grayscale.
The line vec4 color = texture2D(uMainSampler, outTexCoord); allows you to obtain the original value of the pixel. It fetches it from the texture data at the corresponding position. Then, we obtain grayscale by computing the dot product of the initial color with another color vector (vec3(0.299, 0.587, 0.114). Try changing the values in that vector and see what happens! Finally, the pixel color is updated by updating the gl_FragColor field. (Note: Thanks to Antriel on Phaser’s Slack channel for pointing me in the right direction to make this shader.)
Applying the shader
Now that we have crated a texture pipeline corresponding to our shader, we need to add it to the renderer:
this.grayscalePipeline = this.game.renderer.addPipeline('Grayscale', new GrayscalePipeline(this.game));Then, in applyPipeline() (called by the UI), the camera applies the shader as follows:
this.cameras.main.setRenderToTexture(this.grayscalePipeline);As simple as that! In the code, the methods changeMode() and applyPipeline() are simply helper methods to juggle between shaders. The essential logic fits in the two lines displayed above.
To illustrate further the possibilities offered by shaders in Phaser 3, let’s dive in the distortion shader.
Distortion shader
js/pipelines.js
I’ve taken this shader from one of the official examples. As you can see in pipelines.js, we use the exact same boilerplate code to define the pipeline. The different part is the actual shader:
precision mediump float;
uniform float     time;
uniform vec2      resolution;
uniform sampler2D uMainSampler;
varying vec2 outTexCoord;

void main( void ) {,
	vec2 uv = outTexCoord;
	uv.y += (sin((uv.x + (time * 0.5)) * 10.0) * 0.1) + (sin((uv.x + (time * 0.2)) * 32.0) * 0.01);
	vec4 texColor = texture2D(uMainSampler, uv);
	gl_FragColor = texColor;
}
This one may look complex, but the idea behind it is actually pretty simple: we set the color of one pixel to the color of another pixel located elsewhere in the scene.
uv is the original coordinate of a pixel in the scene. The second line computes a new y coordinate by applying a convoluted formula to it. The returned value depends on the time (more on that below) as well as the original x and y coordinate of the pixel. So far, nothing has changed yet, we simply computed a new location. The magic happens in the following line:
vec4 texColor = texture2D(uMainSampler, uv);This basically fetches the color of the texture at the newly computed location, and use it to replace the color at the original location.
The long formula above dictates which target pixel to use to replace the color of each original pixel. The use of the sine and cosine functions provide the undulations. Feel free to try other formulas and see what effects you get.
Passing data from the game to the shader
js/game.js
But wait, how come the waves move? Well, it’s because of the time variable. This one is interesting, because it’s a variable sent to the shader from the Phaser game. In create, the following variables are created:
this.t = 0;
this.tIncrement = 0.005;
And used in update:
this.t += this.tIncrement;And passed to the shader:
this.distortPipeline.setFloat1('time', this.t);So the games takes care of updating a t variable, some sort of measure of the passage of time, and feeds it to the shader, who uses it in the above formula.
Make sure to understand the few lines above. They showcase a very neat mechanic: passing data computed by the game logic to the shader. This will be demonstrated in an even more interesting way with the spotlight shader below.
Before moving on to the last shader, have a look at the following two Phaser 3 examples: this one and that one. They seem to do the same thing, but look closely! In the first one, the distortion is applied to everything in the scene, including the score text and the sky background. In the second one, the score text and the sky are not distorted! This illustrates a great Phaser 3 shader mechanic. By using multiple cameras, you can selectively apply shaders to different parts of your scene. See below:
var cam1 = this.cameras.main;
var cam2 = this.cameras.add(0, 0, 800, 600);
cam2.ignore([ sky, this.scoreText ]);
cam2.setRenderToTexture(this.customPipeline);
In the above snippet, we apply the shader to cam2, but since that camera ignores the sky and the text, they are not affected by the shader!
Now let’s move on to the spotlight shader.
Spotlight shader
js/pipelines.js
By now you should be familiar with how shaders are deployed in a Phaser 3 game, so let me focus on the shader code:
precision mediump float;
uniform vec2 resolution;
uniform float tx;
uniform float ty;
uniform float r;
uniform sampler2D uMainSampler;
varying vec2 outTexCoord;
vec3 makeCircle(vec2 st,vec2 center, vec3 col){
float d = distance(st,center);
float pct = smoothstep(r,r+0.1,d);
return vec3(1.0-pct)*col;
}
void main(void) {
// st is the normalized position of the pixel in the scene
vec2 st = vec2(gl_FragCoord.x/resolution.x,gl_FragCoord.y/resolution.y);
vec4 color = texture2D(uMainSampler, outTexCoord);
gl_FragColor = color*vec4(makeCircle(st,vec2(tx,ty),vec3(1.0)),1.0);
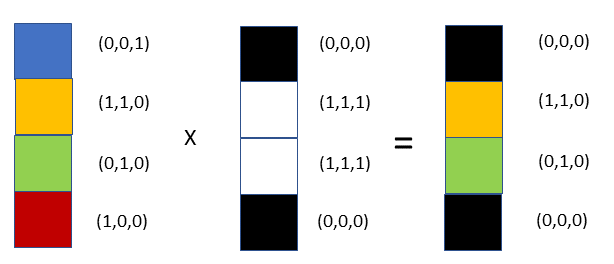
}Here we use a custom makeCircle() function to draw a circle by coloring in white the pixels that are within a given distance of the given center. Or more exactly, we don’t color any pixel yet, but we compute what color they should eventually have. The actual coloring takes place at the very last line of main() and combines the initial color of the pixel with the newly computed one by multiplying them.
Let’s think about what happens here. If a pixel is within the circle, we’ll compute a white color for it, that is, set all its colors level to 1. When it’s not, we set it to black, so all colors level are set to 0. Then we multiply the initial color by these values. When multiplying by 1, we will essentially preserve the initial color, whereas multiplying by 0 will set it to black. The end result is that only the pixels within the circle keep their initial colors and remain visible. All the others become black! This is quite similar to the concept of masking, if you are familiar with it. The picture below attempts to visualize it.
The last nice touch is to continually send the (normalized) position of the ball to the shader so that the circle/spotlight follows it. The following code does this in the update() method of the game:
this.spotlightPipeline.setFloat1('tx', this.ball.x/this.game.config.width);
this.spotlightPipeline.setFloat1('ty', 1-(this.ball.y/this.game.config.height));
Pretty neat, huh?
Closing words
That’s it. Hopefully this article allowed some of you to discover shaders and get a glimpse of the immense potential they offer. In addition, you should now be able to apply your own shaders in Phaser 3. I’m personally still quite new to it, but I’m currently working on hopefully cool effects for my own game.
If you want to learn more, I invite you to look at the resources linked at the beginning of the article. If you discover particularly interesting shaders or make nice ones yourself, let me know in the comments. Looking forward to it!
Jerome Renaux
I'm an independent game developer, working mainly on browser-based multiplayer online game (HTML5 & Javascript). I love to discuss about all aspects of game development so don't hesitate to get in touch!
Follow Me: