In a previous tutorial, we looked at how to make a basic multiplayer online game with Phaser, Node.js and Socket.io. Hopefully you managed to clone the repository and have it run locally, but what if you want to put it online? There is a wide range of platforms on which you could host your game. This tutorial covers how to host it on Heroku, which offers free hosting for small apps with little traffic (and can scale up for more intensive apps for a fee).
In this tutorial, the goal will be to host a Node.js app on Heroku, which will act as the server of a small multiplayer Phaser game.
Creating the Heroku app
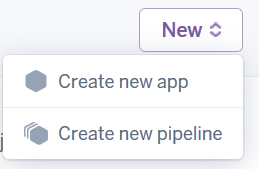
The first step is obviously to register on Heroku for free, which I leave up to you. Once you are done, navigate to your dashboard, which should be empty at the moment. In the top-right corner, click on “New”, then “Create new app”.
In the new screen, choose a name for your app. Be aware that the name you choose will appear in the URL of the app, in the form: http://your_app_name.herokuapp.com (of course if you feel like it you can book a domain name to cover it up later on).
The region choice will have an impact on latency. If you select Europe for example, your app will be hosted on European servers, and therefore will be delivered faster to people from Europe than people from the US. This is not great for a game, for which you typically want to minimize latency for everyone. Fortunately, is it possible to have your app running in multiple regions, but we’ll not cover this more advanced aspect in this tutorial.
Once you click “Create app”, your app will be created. The next page lists instructions about how to deploy code to your newly created app. There are multiple solutions: using the Heroku CLI, linking a Github account, or even using Dropbox. Here we’ll cover the most common approach which is using the Heroku CLI.
The Heroku Command Line Interface (CLI) is a program that allows you to manage your apps from the terminal of your machine. On the linked page, follow the instructions to download and install it.
When this is done, you are ready to upload code, but first let’s look at some considerations specific to running a Node.js app on Heroku.
Setting up a Node.js app
package.json
In the root directory of your source code, make sure to have a proper package.json file for your project. This files contains all the instructions for the installation of your Node.js app, and will be parsed by Heroku in order to properly install your app. The most important section is the list of dependencies, that is, the list of npm modules that your app requires to work. Make sure to list them all, otherwise the app will crash when requiring a module that will not be installed (because you haven’t told Heroku to install it). In the case of our basic online game, you can view the package.json file here. Below is the list of dependencies:
"dependencies": {
    "express": "^4.15.2",
    "socket.io": "^1.7.3"
}
This means that our app requires express v4.15.2 or higher and socket.io v1.7.3 or higher to work. Note that you can also list “dev-dependencies” (dependencies only used for the development of the game), which will be ignored by Heroku.
Proc file
Another important file is the Procfile (for “process file”). This file can be used to specify what commands should be run in order to correctly execute your app. This is particularly useful when you need to pass specific arguments to your server when starting it. In the case of our small game, the Procfile contains only one line:
web: node server.js
This means that the command “node server.js” should be run. In our case, server.js is the entry point of the app and is therefore the file that should be provided to the “node” command to start the app.
Make sure to have a file named “Procfile” (without any extension) located at the root of your project directory, with the single line from above in it. When the time comes to start your app, Heroku will be looking for it in order to know what to do.
Note that it can be a good idea to add the Procfile to your .gitignore file. As your game grows, the Procfile may contain deployment-specific information that you would not want to upload on your possibly public git repository. Passwords and such are best stored as environment variables and therefore would typically not be visible in the Procfile, but the best practice is to keep that file private nevertheless.
Deploying code
Basically, you can view your app as a git repository, to which you can push code just like with any usual repository. To do so, you first need to create a local git repository for your project on your machine if you don’t already have one, with the git init command. If you want to practice with the basic game from the previous tutorial, you can instead create a repository by cloning the one of the tutorial: git clone https://github.com/Jerenaux/basic-mmo-phaser.git.
Then add a new remote repository to your current project with the heroku git:remote -a . Note that this last command requires the Heroku CLI to be installed on your machine (see above).
If you are not familiar with git, it may be useful as this point to look up tutorials about it, or to look into alternative deployment methods offered by Heroku.
Once you have followed all the above steps, you can finally commit your code and push it (git push heroku master). Wait a minute for the app to be built, then navigate to the address of your app. If you did everything correctly, the index page of your app should be displayed (in the case of the small online game from the previous tutorial, you should see the toy map with your character on it).
What if it doesn’t work
Sometimes it won’t work and you’ll see an error message telling you that something somewhere went wrong. If this is the case, first have a look at the log displayed when you pushed your code and see if it doesn’t indicate any error. If not, then you need to have a look at the logs generated by your app. To do so using the Heroku CLI, simply use the command heroku logs. This will display the last 100 lines of your app’s log (you can adjust this number with the -n argument). Anything that is logged by your app (exceptions, information logged using console.log() calls or variants thereof…) will appear there and should help you to track down the error. A common one is that a Node module cannot be found because you omitted to list it in the dependencies section of your package.json file.
Using a database
Our example game doesn’t require it, but you might eventually feel the need to use a database for your project. To do so, you need to activate an Heroku add-on for your app that can provide this service. I recommend the mLab MongoDB add-on, which I use (for free) for Phaser Quest.
To activate an add-on, go to the “Overview” tab of the dashboard of your app, and click “configure add-ons”. In the search bar, enter the name of the add-on you want, and select it to be able to provision it. A future tutorial will cover the details of using a database on Heroku.
Closing comments
Hopefully, this tutorial combined with the previous one should enable you to set up a small multiplayer game and have it permanently accessible online. If anything didn’t work when following the steps of this tutorial, feel free to drop a comment to ask for help.
Jerome Renaux
I'm an independent game developer, working mainly on browser-based multiplayer online game (HTML5 & Javascript). I love to discuss about all aspects of game development so don't hesitate to get in touch!
Follow Me: